Introduction
An ABS (Anti-lock Braking System) control module plays an important role in making sure your vehicle's braking system operates safely and effectively. However, like any other component, it can develop faults over time. Determining the symptoms of a faulty ABS control module and understanding the repair process can save you from possible accidents and costly repairs. This guide will help you identify common issues, gather necessary tools, execute a step-by-step repair, and test your repairs to make sure your ABS system is back in top shape.
1. Identify symptoms of a faulty ABS control module
Becoming familiar with the red flags of a faulty ABS control module is the first step towards successful ABS control module repair. So, what signs should you be on the lookout for?
- The ABS light on your dashboard is on: This is the most common symptom. If the ABS light stays on even after you've started your car, it's time to check the ABS control module.
- Your brakes are less responsive or not responsive at all: This is a serious symptom; if you notice this, it's time to get that ABS control module repair started right away.
- You feel a pulsing in the brake pedal: This is not your foot playing tricks on you. It's a sign that the ABS control module may be calling your attention.
- Your car skids during braking: If your car skids while braking, especially on wet roads, it's high time you looked into ABS control module repair.
These symptoms could be your car's way of saying, "Hey, I need a little attention here!" Now that you're well-versed in the signs of a faulty ABS control module, you're one step closer to fixing the problem. Ready to prep for the repair? We'll cover that in the next section. Stay tuned!
So, you've noticed the signs and are now ready to roll up your sleeves and dive into the ABS control module repair. But wait! Before we get our hands dirty, let's ensure we have all the necessary tools. Having the right tools not only makes the job easier but also ensures the repair is done correctly and safely.
Set of Screwdrivers
The first thing you'll need is a set of screwdrivers. You'll need various sizes and types, as the screws in the ABS control system aren't all the same.
Wrench Set
Different parts of the ABS control module will require different types of wrenches. So, you'll want to have a full set on hand.
Multimeter
You'll need this handy tool to test the circuits in your ABS control module. Remember, safety first!
Socket and Ratchet Set
A socket and ratchet set will help you remove and replace the ABS control module with ease.
Penetrating Oil
Sometimes, screws and bolts can be stubborn. A bit of penetrating oil can save you a lot of time and effort.
Gloves and Safety Glasses
Last but not least, don't forget your safety gear. When dealing with ABS control module repair, protecting your hands and eyes is key.
Having all your tools ready and within reach will make the repair process smoother and more efficient. So, have you got them all in your tool kit? Next, we'll move on to the exciting part — the step-by-step repair process!
3. Execute step-by-step ABS control module repair
Now that you've collected all the necessary tools, it's time to proceed with the ABS control module repair. Remember, patience is key during this process. Let's get started!
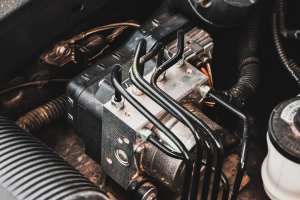
Locate the ABS Control Module
Your first task is to find the ABS control module. Typically, you'll find it in the engine compartment. Consult your vehicle's manual if you're unsure about its location.
Disconnect the Battery
Before you begin, disconnect the battery. If you don't like electric surprises. It's a simple step but an important one for safety.
Remove the ABS Control Module
Once you've found out the ABS control module and disconnected the battery, you can start the removal process. Use your socket and ratchet set to carefully remove the bolts securing the ABS control module. Keep track of all screws and bolts; you don't want to lose any! Remember, if any bolt is stubborn, that's where your penetrating oil comes in handy.
Inspect and Repair
With the ABS control module removed, it's time for the inspection. Use your multimeter to identify any circuitry issues. Any damaged circuits will need repair or replacement.
Reinstall the ABS Control Module
After repairing the necessary components, you'll need to reinstall the ABS control module. Ensure you secure it properly with all the bolts you removed earlier. Double-check all your connections to ensure they're tight and secure.
Reconnect the Battery
The final step in your ABS control module repair is reconnecting the battery. Once done, you're ready for the testing phase.
And there you have it — a step-by-step guide to ABS control module repair. Remember, take your time and follow each step carefully. You've got this!
4. Test and Confirm Successful ABS Control Module Repair
Great job on getting through the repair process! Now let's turn our focus and move into the testing phase to confirm if your ABS control module repair was successful.
Start Your Vehicle
Fire up your engine and let it run for a few minutes. This gives the ABS control module time to recalibrate. It's okay to feel a little anxious — that's part of the process!
Check the ABS Light
Pay attention to the ABS light on your dashboard. If the repair was successful, the light should turn off after a few seconds. If it stays on, don't panic. It might simply mean that the system needs more time to reset.
Put your vehicle in gear and go for a test drive. This allows you to test the ABS system under real conditions. Be sure to choose a safe location where you can comfortably test your brakes.
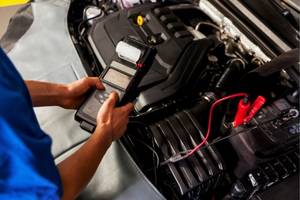
Check for Error Codes
After your test drive, use your OBD-II scanner to check for any ABS-related error codes. If no codes appear, that's a sure sign of a successful ABS control module repair.
Inspect the ABS Control Module
Finally, do a last inspection of the ABS control module. Ensure it's secure and there are no loose wires.
And there you have it, folks! With this testing phase complete, you can confidently say you've successfully repaired your ABS control module. So, how about a pat on the back for a job well done?
Conclusion
Successfully repairing your ABS control module can improve your vehicle's safety and performance. By recognizing the symptoms of a faulty ABS module, gathering the right tools, and following a detailed repair process, you can handle this task confidently. Remember, thorough testing after the repair is essential to make sure everything functions correctly. With these steps, you're well-equipped to maintain your vehicle’s braking system in ideal condition. Safe driving and happy repairing!
FAQs on
Steps to ABS Control Module Repair in 2025 : Comprehensive Guide
-
1. What are the symptoms of a faulty ABS control module?
Ans.
Symptoms include an illuminated ABS light on your dashboard, less responsive or unresponsive brakes, a pulsing brake pedal, and skidding during braking, especially on wet roads. If you notice these signs, it’s necessary to address the issue quickly.
-
2. What tools do I need for ABS control module repair?
Ans.
You will need a set of screwdrivers, a wrench set, a multimeter, a socket and ratchet set, penetrating oil, and safety gear like gloves and safety glasses. These tools will help you handle the repair efficiently and safely.
-
3. How do I locate the ABS control module?
Ans.
The ABS control module is generally located in the engine compartment. Consult your vehicle’s manual for the exact location if you’re not sure.
-
4. Why is it important to disconnect the battery before starting the repair?
Ans.
Disconnecting the battery prevents electrical shocks and avoids any possible short circuits or accidental activation of the ABS system while you’re working on it.
-
5. What should I do if the ABS light remains on after repair?
Ans.
If the ABS light remains on, it could mean the system needs more time to reset. Perform a test drive and check for error codes using an OBD-II scanner. If the light still stays on, there may be an underlying issue that needs further investigation.
-
6. How can I test if the ABS control module repair was successful?
Ans.
Start your vehicle and check if the ABS light turns off after a few seconds. Perform a test drive in a safe location to evaluate the ABS system's performance. Use an OBD-II scanner to check for any error codes and inspect the ABS control module to make sure it is securely reinstalled.