Introduction
When your vehicle starts acting up, the problem might not always be immediately obvious. A malfunctioning Electronic Control Module (ECM) can be the culprit behind issues like poor fuel economy, engine misfires, or the dreaded check engine light. This guide will walk you through the necessary steps of diagnosing, removing, repairing, and reinstalling your ECM. By following these steps, you’ll be well-equipped to handle ECM repairs, making sure your vehicle runs smoothly and efficiently.
1. Identify the problem with your Electronic Control Module (ECM)
Before getting your hands dirty, we need to identify if the ECM is indeed the problem. Signs of a faulty ECM include poor fuel economy, a misfiring engine, failure to start, and even a lit-up check engine light. However, these could also be symptoms of other issues, so we need to be sure. How can you be certain, you might ask?
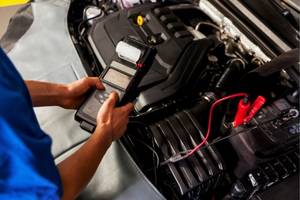
Start by checking for error codes. Modern vehicles come equipped with an On-Board Diagnostics II (OBD-II) system. This system stores trouble codes when it detects a problem. You can read these codes using an OBD-II scanner—think of it as the vehicle’s way of telling you what’s wrong. If the codes point towards the ECM, you have your culprit.
Next, perform a visual inspection. The ECM, usually located under the hood or dashboard, should be free of physical damage. Cracks, corrosion, or loose wires could all be signs of a malfunctioning ECM. Remember, electronic control module repair often involves dealing with intricate circuitry, so a keen eye for detail can save you a lot of trouble in the future.
Finally, consider the performance of your vehicle. Is it behaving strangely? Has the fuel economy dropped dramatically? If so, these could be indicators that your ECM needs some attention. It's a bit like when you're feeling under the weather—your body's performance drops, signalling that something is off.
Remember, the first step to effective electronic control module repair is accurate problem identification. Once you've nailed this step, you're one step closer to getting your vehicle back on the road. And isn't that what we all want—to enjoy smooth, worry-free rides?
2. Remove the ECM safely from your vehicle
After identifying the issue, the next step in the electronic control module repair process is to remove the ECM from your vehicle. This process can be a bit tricky, but with a little patience and the right tools, it's something you can accomplish. Let's break it down into manageable steps.
Before you begin, make sure the vehicle is turned off and the keys are removed from the ignition. This ensures your safety and prevents any accidental shorts when dealing with the ECM.
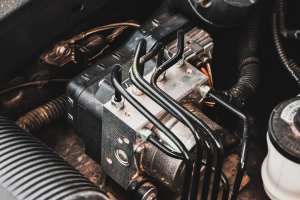
Locating the ECM is your first task. As mentioned earlier, it's usually located under the hood or the dashboard. Refer to your vehicle's manual if you're having trouble finding it. Once you've found it, take a moment to photograph the ECM and its connections. This will serve as a handy reference when it's time to reinstall it.
Ready to start? Great! Now, using a screwdriver, gently loosen the bolts holding the ECM in place. Be mindful not to lose any screws or bolts—you'll need them later for reinstallation.
Now, carefully disconnect the connectors linking the ECM to the vehicle. This is where your reference photo comes in handy! It's important to remember that these connections are breakable; undue force may result in damage, complicating your electronic control module repair journey.
Once the connectors are safely disconnected, you can remove the ECM. Hold it by the edges to prevent any static electricity from damaging the circuitry. Congratulations! You've successfully removed the ECM from your vehicle. You're well on your way to completing the electronic control module repair.
Removing the ECM may seem difficult, but remember—it's just like dismantling a lego structure. With a bit of patience and care, you're more than capable of doing it. And, just think of the satisfaction you'll feel when you've fixed the problem yourself!
3. Repair or replace the faulty components
Now that your ECM is out and on the workbench, it's time to get down to the real electronic control module repair business—repairing or replacing the faulty components.
Identifying the Faulty Component
The first step here is to identify what's wrong. If you're lucky, the problem might be visibly evident—a blown capacitor or a burned resistor, for example. But sometimes, the problem isn't so obvious. In this case, a multimeter will be your best friend. You can use it to check the resistance and continuity of individual components.
Repairing the Faulty Component
If the problem component is something simple, like a fuse or a capacitor, you might be able to repair it yourself. You'd need a soldering iron and some solder for this. The idea is to desolder the faulty component and replace it with a new one. Remember, the keyword here is careful; you wouldn't want to accidentally damage any other components in the process, would you?
Replacing the Faulty Component
Sometimes, the fault may be with a complex and critical component, or it might be beyond repair. In such cases, replacement is the best option. You can find replacement parts from auto parts stores or online. Make sure the replacement part is compatible with your vehicle's make and model to avoid any compatibility issues later on.
Completing the electronic control module repair can indeed be a rewarding experience. But, there's no shame in seeking professional help if the task seems too complicated. After all, the goal is to get your vehicle back on the road, and there are many paths to that destination.
4. Reinstall the ECM and test for success
You've made it to the final step of your electronic control module repair journey—reinstalling the ECM and testing it. Pat yourself on the back; you're almost there!
Reinstalling the ECM
Reinstallation is basically the removal process in reverse. Start by carefully placing the ECM back in its designated spot. Next, reconnect the wiring harnesses and secure everything with the appropriate fasteners. Remember, the keywords here are patience and precision. You don't want to rush this part and risk damaging your freshly repaired ECM, right?
Testing for Success
With the ECM back in its rightful place, it's time to see if your repair efforts were successful. Turn on your vehicle and check if the previously experienced issues still occurs.
Did the check engine light stay off this time? Are the erratic gauge readings now steady? If yes, congratulations! You've successfully completed an electronic control module repair. If not, don't lose heart. It might take a couple of tries to get it right, especially if it's your first time.
And that's it! You've navigated through the process of diagnosing, removing, repairing, and reinstalling your vehicle's ECM. By now, I hope you're feeling a bit more confident about tackling electronic control module repair projects. So, gear up and take the driver's seat—the open road awaits!
Conclusion
Successfully repairing or replacing your ECM not only saves you time and money but also gives you a deeper understanding of your vehicle's inner workings. From identifying the issue to testing your repair, each step is a building block towards making sure your vehicle's performance and reliability. Remember, while the task might seem challenging, patience and accuracy are your best allies. With these skills, you can confidently address ECM issues and enjoy a smoother driving experience.
FAQs on
Effective Electronic Control Module Repair in 2025 : Practical Guide
-
1. What are common signs that my ECM might be faulty?
Ans.
Common signs of a faulty ECM include poor fuel economy, engine misfires, failure to start, and a check engine light. These symptoms could also indicate other issues, so a thorough diagnostic check is important.
-
2. How can I check if the ECM is the issue?
Ans.
Use an OBD-II scanner to read the trouble codes stored in your vehicle’s diagnostic system. If the codes point to the ECM, it is likely the source of the problem. A visual inspection of the ECM for physical damage or loose connections can also help in diagnosis.
-
3. What should I do before removing the ECM from my vehicle?
Ans.
Make sure the vehicle is turned off and the keys are removed from the ignition. Locate the ECM (typically under the hood or dashboard), and photograph its connections for reference. Carefully loosen the bolts holding the ECM and disconnect the connectors.
-
4. How do I repair or replace faulty components in the ECM?
Ans.
Identify the faulty component, such as a blown capacitor or a burned resistor. Use a multimeter for testing if the fault isn't immediately visible. Replace or repair the faulty component using a soldering iron for simple repairs, or opt for replacement parts for complicated issues.
-
5. What should I keep in mind while reinstalling the ECM?
Ans.
Reinstall the ECM by reversing the removal steps. Place it carefully back in its spot, reconnect the wiring harnesses, and secure it with bolts. Ensure all connections are tight and properly aligned to avoid future issues.
-
6. How can I test if the ECM repair was successful?
Ans.
After reinstalling the ECM, start your vehicle and observe if the previous issues have been resolved. Check if the check engine light remains off and if other performance issues have improved. If problems continues, additional troubleshooting may be necessary.