Introduction
Welcome to the ultimate guide on repairing your rebuilt ECM computer! If you've recently invested in a rebuilt ECM, you understand the important role it plays in your vehicle's performance. But what happens when it starts to malfunction? Don't panic! This guide is designed to walk you through the necessary steps to diagnose, repair, and make sure your ECM is running smoothly. Whether you're a seasoned mechanic or a DIY enthusiast, our complete approach will help you handle ECM issues with confidence. Let's dive right in and get your rebuilt ECM computer back in top shape!
1. Identify the Problem with Your ECM Computer
Like a seasoned detective, the first step in repairing your rebuilt ECM computer is to find the culprit—AKA the problem. Here's how:
Listen to your ECM computer: Sometimes, your machine will give off auditory cues. For example, if you're hearing unusual clicking noises, your hard drive could need some love and attention.
Look for error messages: Your computer will often communicate its problems through error messages. If you see something like, "hard drive not found," or "operating system not found," you know exactly where your problem lies.
Pay attention to performance issues: Is your rebuilt ECM computer slower than a tortoise? Are you experiencing frequent crashes or freezes? These could be signs of a memory issue.
Check the peripherals: Sometimes, the problem isn't the ECM computer itself, but the additional. Do a quick check of your keyboard, mouse, printer, and other peripherals to rule them out.
Remember, the key to successful ECM repair is a eager eye for detail and a little patience. So, before you dive in headfirst into the repair process, take a step back and really get to know your rebuilt ECM computer. Once you've found the problem, you're halfway to a solution. But, what's next? Stay tuned as we dive in further into the world of ECM computer repair.
Great! Now that you've found the issue with your rebuilt ECM computer, it's time to collect your repair arsenal. Just like a master chef wouldn't whip up a grand feast without all the necessary kitchen utensils, you shouldn't start on your ECM repair journey without the right tools. Let's get started:
Get a good screwdriver set: A variety of screwdrivers is non-negotiable for any computer repair. Make sure you have both Phillips and flat-head screwdrivers in multiple sizes.
Invest in an anti-static wrist strap: When you're dealing with complicated computer parts, static electricity is the enemy. An anti-static wrist strap will keep you and your rebuilt ECM computer safe.
Have a set of tweezers handy: Tweezers can help you handle small parts or reach into tight spots with ease. A set with both straight and curved tips will serve you best.
Don't forget canned air: Dust buildup can result in overheating, which is a common cause of computer issues. Canned air helps you keep your machine clean and cool.
Consider a multimeter: If you're dealing with power issues, a multimeter can help you test the voltage of your computer's power supply.
In addition to these tools, it's also essential to have a well-lit, clean workspace. Now that you're armed and ready, it's time to get down to business. Up next: the thrilling world of ECM repair!
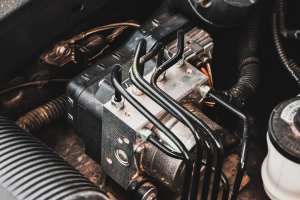
3. Execute the Repair Process
Now that we've got our tools at the ready, it's time to dive right into the essentials of ECM repair. You might be asking, "how do I do this?" Well, here's your answer:
Disconnect and Inspect: Before you start with your rebuilt ECM computer, make sure that it's disconnected from any power source. Next, take a good look at your ECM. Notice any visible damage.
Open Up the ECM: Grab your trusty screwdriver and carefully remove the screws holding the casing of your ECM. Remember to keep count of all the screws — they're popular for disappearing just when you need them the most!
Clean It Out: Once you've got your ECM open, use your canned air to blow out any dust that's built up inside. Remember, cleanliness is next to godliness, particularly when it comes to computer repair.
Identify the Problem Area: Now that your ECM is clean, it's time to find the culprit of your sorrow. This could be anything from a burnt-out capacitor to a loose wire. Use your tools and your eager eye to identify the issue.
Fix It Up: With the problem identified, it's time to for the repair. This can be as simple as re-soldering a loose wire, or as complicated as replacing a faulty capacitor.
Put It Back Together: Once you're confident that you have fixed the problem, reassemble your ECM. Make sure everything fits back in place just like before, with no spare parts left on the workbench.
Now, give yourself a pat on the back! You've just carried out the repair process on a rebuilt ECM computer. But wait, our journey isn't over yet. It's time for the final step—testing and verifying the repair.
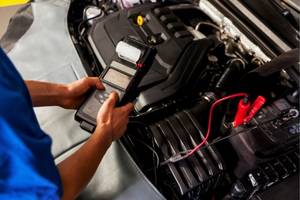
4. Test and Verify the Repair Success
The moment of truth has arrived! It's time to power up your rebuilt ECM computer and see if your repair work has paid off.
Reconnect Your ECM: Now that your ECM is back in one piece, reconnect it to the power source and any other necessary connections. Remember, doing this correctly is important—incorrect connections can cause more harm than good.
Power Up: Flip the switch, press the button, or do whatever it is that you do to power up your ECM. Hold your breath, cross your fingers, and hope for the best!
Observe: Is your ECM working as expected? Are there any error messages or abnormal behavior? These could be signs that your repair might not have been successful.
Run a Diagnostics Test: To be absolutely sure, run a diagnostics test on your ECM. This will check all systems and components, and it should give you a clear picture of whether your repair was successful.
Repeat if Necessary: If your ECM isn't working as it should, don't lose hope. Remember, Rome wasn't built in a day. Go back to step 3 of the repair process and try again. You've got this!
And there you have it! You just have tested and verified the success of your repair on a rebuilt ECM computer. Now, wasn't that a rewarding experience? So, what's the next project on your DIY list?
Conclusion
Congratulations! You've successfully navigated through the complicated process of repairing your rebuilt ECM computer. By identifying the problem, gathering the right tools, executing the repair, and verifying its success, you’ve made sure that your ECM is back to ideal performance. Remember, patience and attention to detail are key in this process. Keep this guide handy for future reference and continue to monitor your ECM for any signs of issues. With your newfound skills, you're well on your way to becoming an ECM repair expert. Happy repairing, and best of luck with your next DIY project!
FAQs on
Step-by-Step Process for Rebuilt ECM Computer Repair in 2025
-
1. What are common symptoms of a failing ECM computer?
Ans.
Common symptoms include unusual noises from the ECM, error messages on the dashboard, performance issues like slow response or frequent crashes, and problems with peripheral devices. If you notice any of these signs, it might be time for a repair.
-
2. Why is it important to use an anti-static wrist strap during repair?
Ans.
An anti-static wrist strap prevents static electricity from damaging sensitive electronic components. Static discharge can cause serious damage to your ECM, so wearing a wrist strap is a simple yet essential step in protecting your repair work.
-
3. How can I determine if the issue is with the ECM or an external component?
Ans.
To determine if the problem lies with the ECM or an external component, start by disconnecting all peripherals and testing the ECM alone. If the issue continues, it's likely with the ECM. If not, check the peripherals one by one.
-
4. What should I do if my ECM repair does not resolve the issue?
Ans.
If your repair doesn’t resolve the issue, revisit your steps. Ensure all connections are secure and no components are damaged. You may need to recheck the problem area or consult a professional for further diagnosis.
-
5. How often should I clean my ECM to prevent dust buildup?
Ans.
It’s a good practice to clean your ECM every 6 to 12 months, depending on your environment. Regular cleaning helps prevent dust buildup, which can cause overheating and performance issues.
-
6. Can I repair my ECM myself, or should I seek professional help?
Ans.
While many ECM issues can be repaired at home with the right tools and knowledge, complicated problems may require professional assistance. If you're not sure or uncomfortable with the repair process, consulting a professional is a safe choice.