Introduction
Ah, the dreaded car computer issue. You're cruising along, enjoying the open road when—bam—your car's computer starts acting up. Suddenly, your drive resembles more of a horror movie. But fear not! With the right knowledge, you can handle this problem directly. Understanding your car's Engine Control Unit (ECU) and knowing how to repair it can save you time, money, and the stress of a mechanic's bill. In this guide, we'll walk you through the necessary steps for diagnosing and fixing your car computer problems, from identifying the issue to making sure a successful repair. Buckle up and get ready to transform yourself from a car owner into a confident DIY mechanic!
1. Identify the Problem with Your Car Computer
Our first stop on this journey is figuring out what's wrong. A car computer, also known as the Engine Control Unit (ECU), is the brain of your vehicle. When it fails, it can cause a too many issues, from decreased fuel efficiency to a car that refuses to start. Identifying these problems with your car computer is your first step in this repair journey.
Check Engine Light: This is your car's way of telling you something is wrong. If your check engine light is on, it's time to investigate. Is it blinking or steady? A steady light typically signals a less severe problem, while a blinking light could indicate a more serious issue.
Poor Performance: Is your vehicle delays, stalling, or just running "off"? These could all be symptoms of a car computer problem.
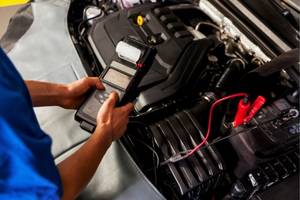
Diagnostic Trouble Codes (DTCs): If you own a diagnostic scanner, use it! These handy tools can read the trouble codes from your car's computer. Each code correlate with a specific problem, from a misfiring engine to a falter oxygen sensor.
Remember, finding the problem is key to knowing how to repair your car computer. So, don't skip this step. It's like going to the doctor—you wouldn't want them to start treatment without a proper diagnosis, would you? So, grab your tools and start investigating. The sooner you identify the problem, the sooner you'll be back on the road.
Stay tuned for the next steps, where we'll talk about collecting the necessary tools and materials, executing the repair process, and testing the car computer to secure a successful repair. Buckle up—it's going to be an amazing ride!
Now that we've identified the issue with your car computer, it's time to gather the tools and materials necessary for this DIY repair mission. Think of it as preparing for a grand adventure—you wouldn't commence on a quest without the right equipment, would you?
Diagnostic Scanner: This is your trusty assistant in your repair car computer journey. As mentioned before, a diagnostic scanner can read trouble codes and help you find the issue. If you don't have one yet, consider investing in one. Brands like Launch, Autel and Ancel offer dependable options.
Repair Manual: This is your roadmap. A good repair manual particularly to your vehicle model can guide you through the repair process, offering important information about your car's computer system.
Basic Toolkit: This should include a set of screwdrivers, a multimeter, and a soldering iron. You never know when you'll need to unscrew, measure, or solder something while fixing your car's computer.
Replacement Parts: Depending on the problem, you may need to purchase replacement parts. For example, if your diagnostic scanner identified a faulty oxygen sensor, you would need to buy a new one.
Clean Workspace: Lastly, make sure you have a clean, well-lit workspace. Repairing a car computer can be a delicate process and having a tidy area can make the task easier.
Now, with your tools and materials at the ready, you're well-prepared to tackle the next stage—executing the repair process. It's time to roll up your sleeves and dive in! Remember, the goal is to repair your car computer, not to become a master mechanic overnight. Take it one step at a time and you'll do just fine.
3. Execute the Repair Process
Well, you've made it this far and I must say, I'm impressed. Your toolkit is ready, your workspace is clean and you've got that spark in your eye that says, "Let's do this!" So, without further ado, let's get down to the essential—repairing your car computer.
Disconnect the Battery
Before we start to mess with any electrical components, it's a good rule of thumb to disconnect your car's battery. Better safe than sorry, right? Just remember to turn off all electrical systems first—like your car's radio or lights—to avoid any unwanted electrical shorts.
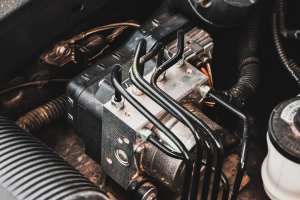
Locate the Car Computer
This might seem obvious, but knowing where your car computer is located is a key step in the repair process. Your car's computer, often known as the Engine Control Unit (ECU), is typically found under the dashboard or under the hood.
Remove and Inspect the Computer
Now, it's time to carefully remove the computer from its place. Refer to your repair manual for particular instructions on how to do this. Once removed, inspect it for visible damage like corrosion, burnt components, or loose connectors.
Repair or Replace Necessary Parts
Based on your diagnostic scan and your own inspection, you should have a fairly good idea of what needs repairing. Whether it's a simple connector issue or a major component replacement, take your time and follow your repair manual's instructions closely.
Remember, Rome wasn't built in a day and neither will your car computer be repaired in a blink. Patience, my friend, is definitely a dignity when it comes to repair work.
Reinstall the Computer
With the repair work done, it's time to reinstall the computer. Ensure all connections are secure and everything is placed back correctly.
And there you have it! You've successfully gone through the repair process. But the journey isn't over just yet. It's time to test the car computer and make sure your repair work was successful. Trust me, the peace of mind you'll get from knowing you did it right is worth the extra effort.
4. Test the Car Computer to Ensure Successful Repair
Congratulations are in order! You've made it to the final stage of this car computer repair journey. But hold on, don't start celebrating just yet. There's still some work to be done. Let's make sure your effort has paid off—time to test your car computer!
Reconnect the Battery
Yes, we're back to where we started. Reconnect your car's battery, making sure the terminals are clean and the connections are secure. Remember, a loose connection can throw a wrench in the whole repair process.
Start Your Car
Now, let's start the engine. Your car should start smoothly. If it doesn't, don't worry. You might just need to give it a little time. Sometimes, the computer needs a moment to adjust, especially if it was disconnected for a while.
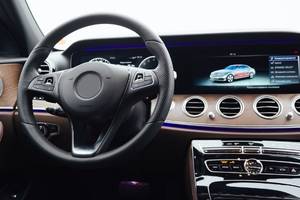
Monitor the Dashboard Lights
As your car starts, pay close attention to the dashboard lights. The check engine light, in particular, should come on and then turn off after a few seconds. If it stays on, it might be an indication that the repair didn't go as planned.
Run a Diagnostic Scan
Remember that diagnostic tool you used in the first step to identify the problem? Well, it's time to bring it out again. Run another diagnostic scan to ensure all previous faults have been cleared. If new faults appear, don't lose heart. It could be something as simple as a loose connector, so double-check your repair work.
Take a Test Drive
Lastly, if all checks out and your car is running smoothly, take it for a test drive. Pay attention to your car's performance. If everything feels right, then you've done it! You've managed to successfully repair your car computer.
So, how does it feel to be your own mechanic? You've gone through the process of repairing your car computer with accuracy and patience. Give yourself a pat on the back—you've earned it!
Conclusion
Congratulations! You've successfully navigated through the journey of repairing your car computer. From diagnosing the problem to collecting tools and executing the repair, you've put in the hard work and attention to detail required for this task. Testing the car computer has confirmed that your repair efforts paid off, making sure your vehicle runs smoothly once again. Remember, while car computer issues can be frightening, your newfound knowledge equips you to handle these challenges with confidence in the future. So, the next time your car's computer starts acting up, you'll be ready to handle it directly. Drive safe and enjoy the open road!
FAQs on
How to Repair Car Computer Successfully in 2025 : Step-by-Step Guide
-
1. What is the Engine Control Unit (ECU) in a car?
Ans.
The Engine Control Unit (ECU) is the brain of your vehicle's engine management system. It monitors and controls many engine functions such as fuel injection, ignition timing, and emissions control. A malfunctioning ECU can lead to poor performance and increased emissions.
-
2. How can I identify if my car computer is malfunctioning?
Ans.
Common signs of a malfunctioning car computer include the check engine light turning on, poor vehicle performance, engine stalling, or diagnostic trouble codes (DTCs) indicating issues. Using a diagnostic scanner can help pinpoint the exact problem.
-
3. What tools do I need to repair a car computer?
Ans.
Necessary tools for repairing a car computer include a diagnostic scanner, a repair manual specific to your vehicle, a basic toolkit (screwdrivers, multimeter, soldering iron), replacement parts, and a clean workspace.
-
4. Is it safe to repair a car computer myself?
Ans.
Repairing a car computer can be safe if you follow proper procedures and take necessary precautions, such as disconnecting the battery before working on electrical components. However, if you're not sure or uncomfortable with the process, consulting a professional mechanic is advisable.
-
5. How do I know if the repair was successful?
Ans.
To make sure the repair was successful, reconnect the battery, start your car, and monitor the dashboard lights. The check engine light should turn off after a few seconds. Running another diagnostic scan and taking your car for a test drive can also confirm that the issue has been resolved.
-
6. What should I do if my car computer issue persists after repair?
Ans.
If the problem continues, double-check your repair work for any loose connections or missed issues. Re-run a diagnostic scan to identify any new or remaining faults. If you're still experiencing problems, it may be best to consult a professional mechanic for further diagnosis and repair.